
How Auckland FC defeated Brisbane Roar
Game and goal analysis, as well as a quick preview of this weekend's match against Sydney FC

Standing amongst the Port on Saturday, I couldn’t shake the feeling that I was witnessing the start of something quite significant. It was a triumphant return of professional football to the city of sails in every sense of the word. We’ve had a couple of cracks at it before, but this time feels different. Auckland’s footballing new dawn is truly upon us.
However, there’s not much more I can say that hasn’t already been expressed about this momentous occasion. Instead, let’s delve into a few observations from the game itself.
Analysis
How the team setup
As anticipated, Auckland went into the game with a 4-2-3-1 formation. The only difference from my predicted lineup was that, after weighing up who would start between Gillion and Rogerson, both ended up playing, with Gillion shifting to the left.

Sakai and De Vries both had licences to get forward, while Verstraete was tasked with shielding the defence as Auckland’s deepest midfielder. Gallegos operated more as a box-to-box midfielder, and his pressing proved valuable for Auckland. The Chilean often jumped up onto Brisbane’s deepest midfielder, disrupting their ability to play out from the back.
Meanwhile, Jake Brimmer was given the freedom to drift onto either flank to get on the ball, while Guillermo May excelled in a false nine role, often dropping into the space to receive passes and link play effectively. This allowed Gillion and Rogerson to stay high and wide, ready to exploit counterattack opportunities. Overall, it was a well-structured setup.
Building from the Back
Despite having less possession, Auckland did a good job when they did have it at the back, transitioning it forward with purpose. They predominantly moved the play down the left side, with De Vries heavily involved. A prime example is this opportunity for Liam Gillion, which begins with Paulsen receiving the ball and shifting it over to Pijnaker:

Pijnaker plays a pass to De Vries, who in turn finds Brimmer, the Australian having drifted over to the left flank:

Brimmer turns well and passes to May, who has dropped into the false nine position, where he excelled throughout the match:

May plays the ball around the corner first time to De Vries, who now has the whole left-hand side to himself:

De Vries sends Gillion through, who perhaps could have done better with his one-on-one opportunity, though the angle was tight:


In just a few passes, Auckland transitioned the ball from their goalkeeper into a 1 v 1 chance. For the team’s first-ever professional game, I thought it was quite an impressive bit of play. De Vries, in particular, was instrumental. He not only broke the initial line with his pass to Brimmer but also continued his run to set up Gillion for the shot on goal. It’s a move that shows how important De Vries was to Auckland’s build-up, perhaps benefitting from being somewhat of an unknown prospect in the A-League.
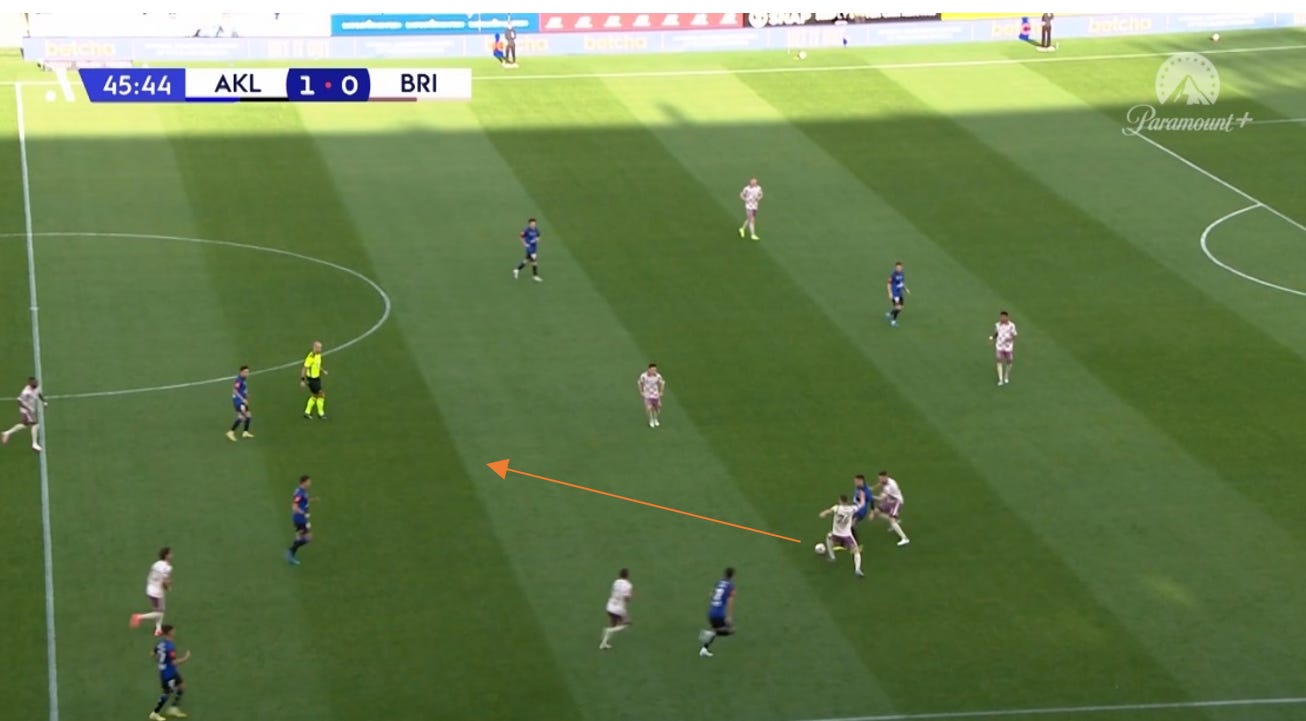
When Auckland struggled to bypass Brisbane’s press, they were happy enough to knock the ball up to May, who would drop deep and did a great job all game of retaining possession and playing a nice pass. Check out this example. Dan Hall knocks a ball up from Auckland’s own half, and May takes a nice touch and lays it off to Verstraete, with two defenders closing in:
Gliding Gillion
A special word for Liam Gillion, another player without A-League experience who excelled on the day. In my profile on Neyder Moreno, I emphasised the importance of having a one-on-one specialist in modern teams. While I concluded that Neyder Moreno wasn’t quite that type of player, it turns out Auckland already has one in Liam Gillion. A lineup featuring Gillion and Moreno on the flanks could work well, given their complementary skillsets.
I particularly loved this moment when Gillion isolated his fullback on the flank, leaving him stumbling with clever feints and guile:


Glorious.
Brisbane blunted
Auckland left Brisbane looking largely ineffective throughout the match. A few stats I’ve picked out that illustrate this:
Possession vs. Impact: Brisbane had 58% of possession but did little with it. Their expected goals (xG) were just 0.44, with 25% coming from set pieces, while Auckland’s xG stood at 1.23.
Box Touches: Despite dominating possession, Brisbane recorded only 12 touches in the Auckland box, compared to Auckland’s 19 (with Liam Gillion contributing 8 and Guillermo May 5).
Shots on Goal: Auckland took 16 shots, outpacing Brisbane’s 12. While Brisbane had 5 shots on target—2 more than Auckland—they created no big chances, whereas Auckland generated 3.
Interceptions: Auckland made 17 interceptions during the game, compared to just 3 for Brisbane(!).
The takeaway is clear: although Brisbane controlled the ball, Auckland’s defensive work rendered the Queenslanders toothless. It was an impressive display and a promising sign for the season ahead. Just look at the Phoenix last year to see how far a solid defence can take a team in the A-League.
So, how did Auckland achieve this?
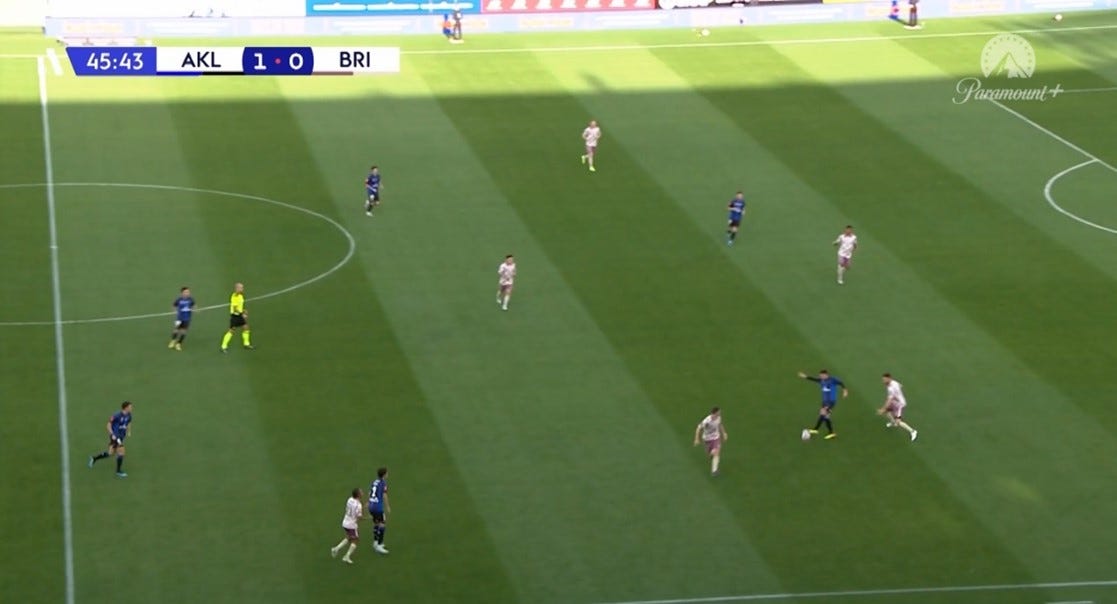
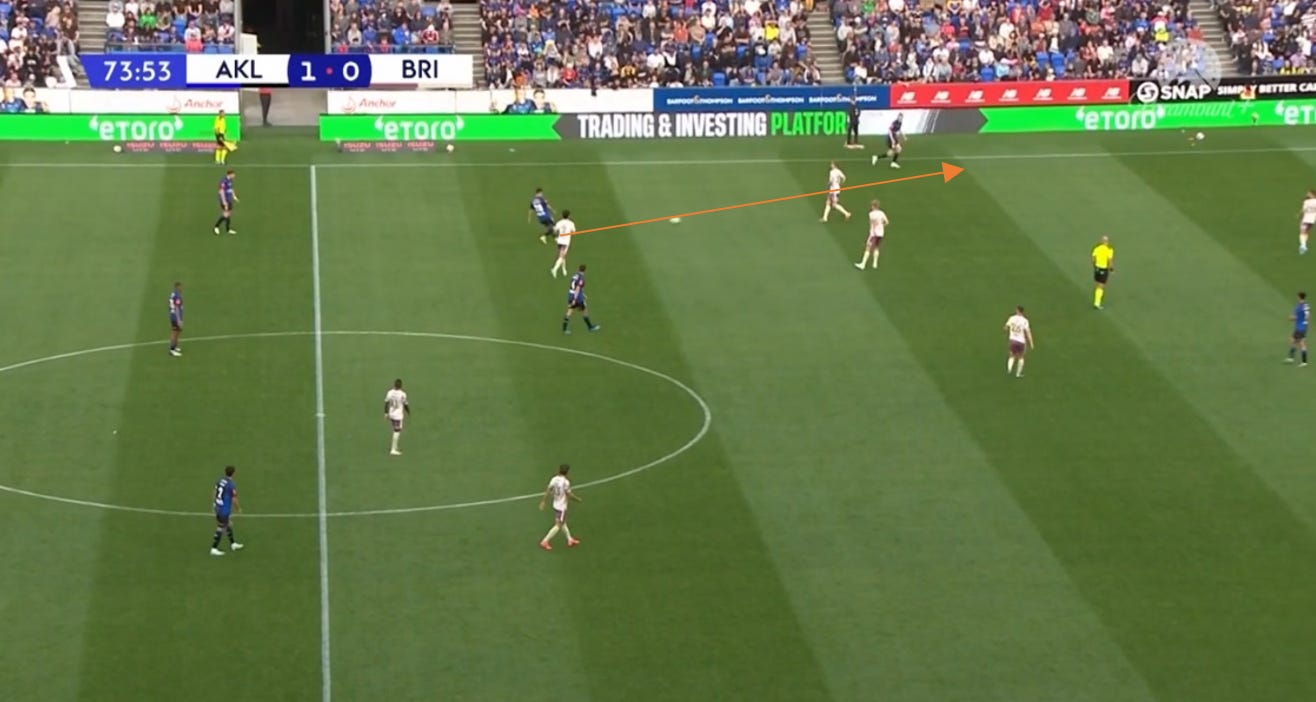
Out of possession, Corica employed a 4-4-2 shape (as expected), with Brimmer joining May to press Brisbane’s centre-backs. You can see the three organised banks of players below:
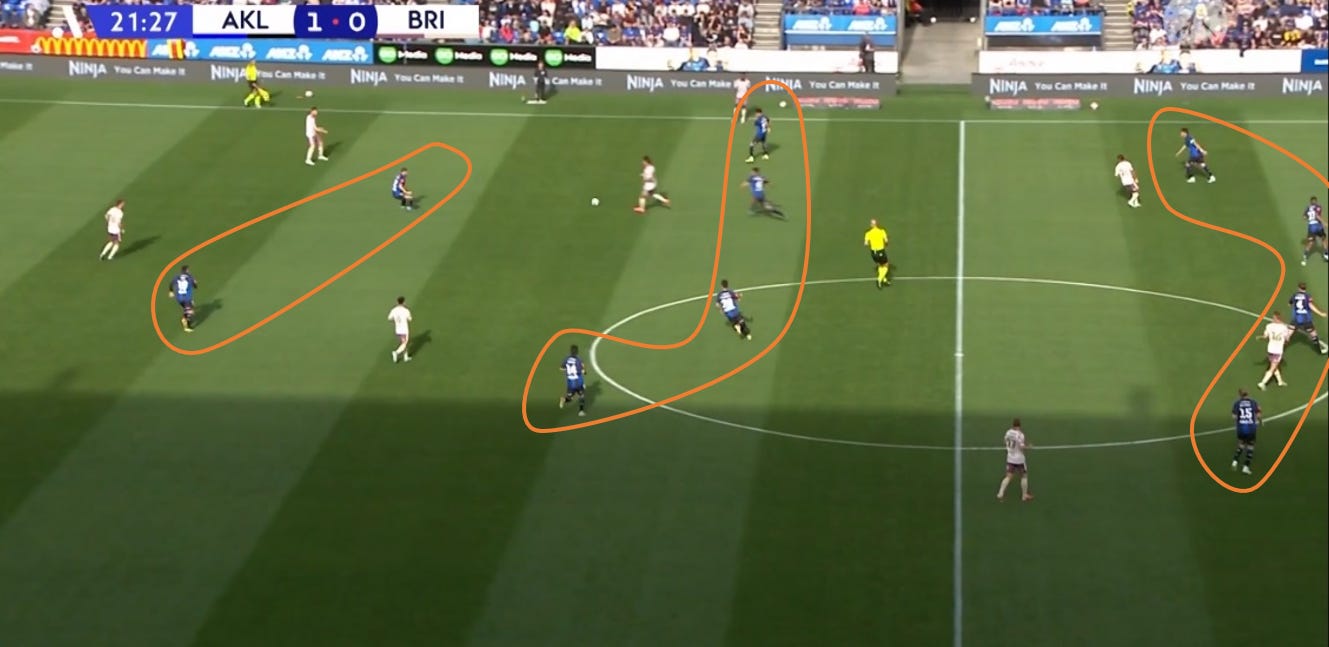
Auckland maintained this disciplined shape throughout the match. May and Brimmer ensured that Brisbane’s defenders had little time on the ball, and when Brisbane did manage to bypass this initial line of pressure, an Auckland midfielder—typically Gallegos—was quick to close them down, often forcing the player to pass back to where it came from. It was evident that Brisbane's chances mainly arose from long balls into the channels, as Auckland effectively suffocated any attempts to play through the lines.
Then there’s the personnel to consider. Between Alex Paulsen, Auckland’s back four (Sakai, Hall, Pijnaker, and De Vries), and the deepest-lying midfield in Louis Verstraete, the team boasted a particularly intimidating defensive unit. All six players are over 6 feet tall and consistently won their duels against Brisbane.
Verstraete, in particular, impressed. He is strong, adept at winning the ball, and plays it forward effectively once he regains possession (as seen in the buildup to the first goal, which we’ll discuss shortly). Not to place too much pressure on him, but he has the potential to be Auckland FC’s Rodri-esque player: a formidable, ball-winning midfielder with the technical ability to advance play and contribute a goal or two across the season.
Late-Game 5-4-1 Adjustment Highlights Corica's Tactical Flexibility
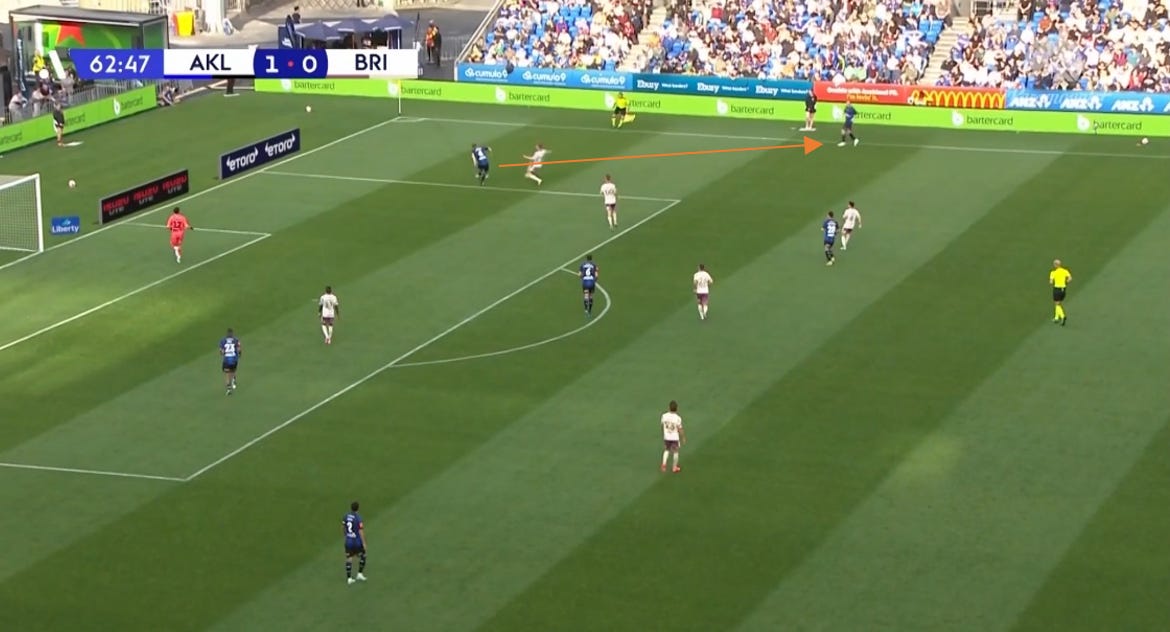
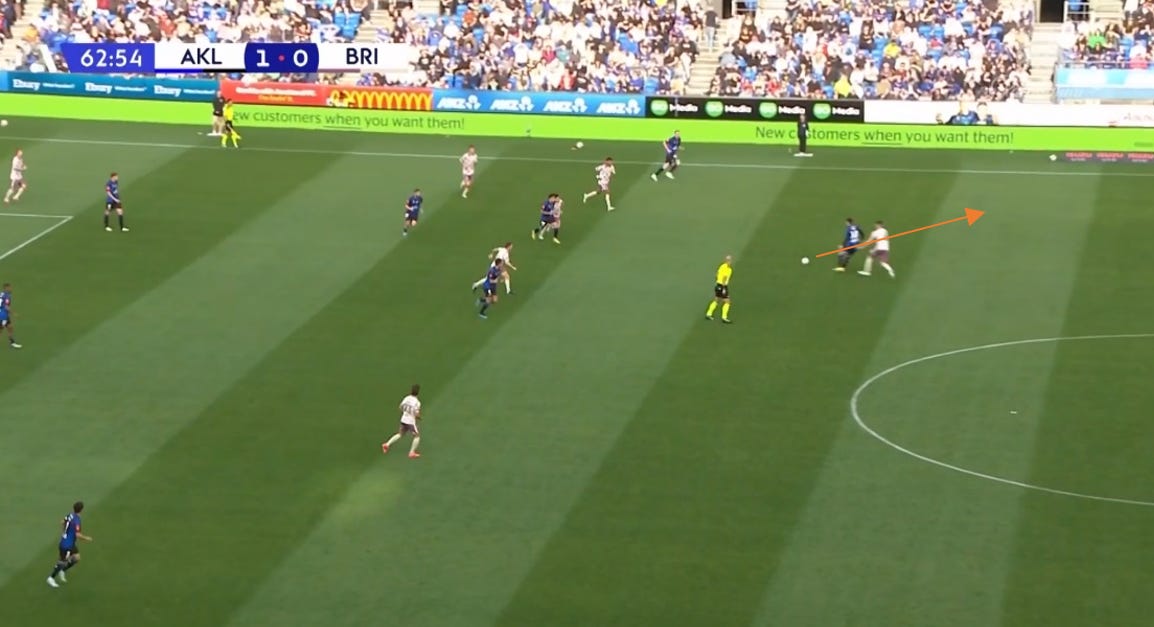
With Auckland taking a two-goal advantage in the second half, Corica tightened things up by bringing Smith on for Verstraete and changing the team into a 5-4-1 shape. This adjustment further solidified Auckland’s defence and completely shut out Brisbane, ensuring Auckland secured the three points. Expect to see more of this approach when Auckland are leading games:


The goals
1-0 (Van der Saag 8’ (OG))
The first goal comes from an errant Auckland pass, but Verstraete does excellently to win it back.
The ball is played out to Sakai, who sends it forward to Rogerson. Rogerson cuts inside and delivers a pass to May. What impresses me here is May's vision. Take a look at the moment just before he receives the ball:
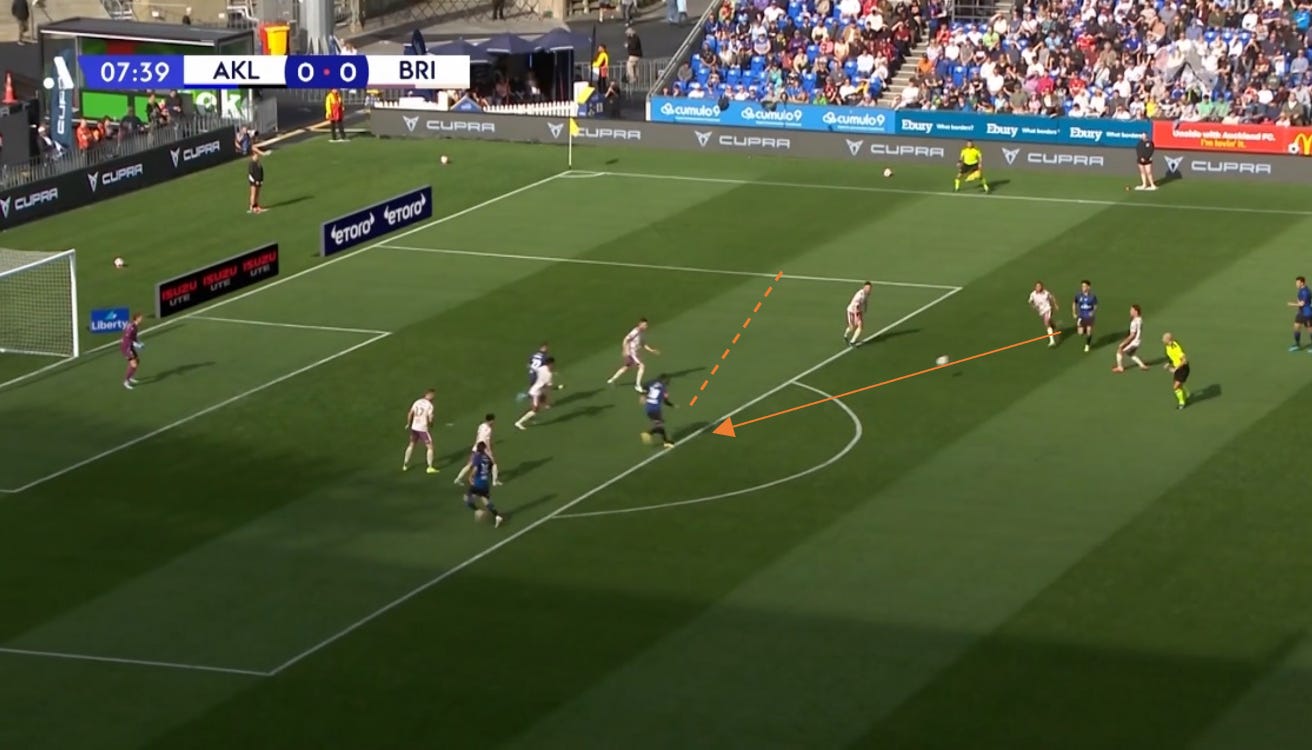
Sakai isn’t even in the frame, but May demonstrates great awareness by identifying his deep run and threading a first-time ball to the Auckland skipper. Sakai carries the ball into a crowded box, and with limited options, he makes the best decision by striking a cross (sorry, Hiroki—no way that was a shot) as cleanly as possible into the danger zone. It’s 1-0 to Auckland FC, and Mt Smart erupts in pandemonium.
2-0 (Rogerson 74’)
The second goal originates from a well-executed sequence of settled possession. Pijnaker plays the ball to Gallegos, who turns cleverly and slides a pass to De Vries:

De Vries advances and delivers a dangerous whipped cross. The Brisbane centre-back should have dealt with it, but he completely misses the ball. The fullback, expecting his teammate to handle the situation, fails to anticipate the pass, allowing Rogerson to slot it home cooly. From my angle in the stands, it almost looked like he missed, but thankfully the ball sneaked in just inside the post.


Next up: Sydney FC and Douglas Costa
On Sunday, Auckland FC faces Sydney FC, a club well known to manager Steve Corica and Director of Football Terry McFlynn, both of whom have captained the team in the past.
Sydney FC won their opening match in the Sydney derby, defeating Western Sydney Wanderers 2-1. I wasn’t able to catch the game as I was coming back from Mt Smart, but I’ve heard they were the better team and could have won by an even wider margin. In other words, it sounds a bit like Auckland’s performance.
Somewhat ominously, reports suggest that Sydney’s marquee signing, Douglas Costa, made a strong impression. The former Juventus and Bayern Munich star started on the left, so expect him to be matched up against Hiroki Sakai on Sunday.
It's worth noting that Sydney FC has been away in Japan this week, where they lost 2-1 to Sanfrecce Hiroshima in the AFC Champions League Two. The round trip from Sydney to Japan, coupled with the flight to Auckland, is a taxing journey. That’s a significant amount of travel, and playing two matches in quick succession could give Auckland a physical edge. They’ll need it, as the Sky Blues boast a stacked squad and are currently favourites to win the A-League this year.
As for Auckland, given their strong start and assuming no injuries, it’s likely they’ll stick with the same lineup. The only potential wildcard is Neyder Moreno, who has earned a place in the matchday squad and could come off the bench. However, it seems unlikely that he’ll be thrown straight into the starting eleven.
Chips review
And to wrap things up, here are a few quick thoughts from my crew on how the Mt Smart chips rated:
MYB: classic, well-cooked chips. No rating
RM: perfectly fluffy interior, could do with being a bit sloppier. 5.8/7
SN: sauce well spread (thanks to RM). Chips were crisp, but soft. 8.2/10.
MP: indulgent, though they could have been a bit sweeter. 8.5/10.
JS: solid chips, but nothing to write home about. 6.8/10.
So there you have it—chip reviews to savour alongside the match analysis! See you on Sunday.